Tuesday, August 27, 2013

奶油螃蟹Creamy Buttery female crabs with roes


This is my favorite crabs and I simply love the sauce. I bought the female crabs with roes at NTUC for about $37 for 2kg worth of crabs. This is simply divine and you can eat all you can. I made extra sauce for this recipe so that I can go with rice or breads or mantou. I have tried many times with this recipe and it was proved yummy by my family and relatives.


Ingredients:

 2 kg female crabs with roes
100 gram of butter
1 can evaporated milk
4-6 birds' eye chillies (leave whole and lightly smashed)
4 stalks curry leaves (leaves only)
1 tsp salt
3 pieces of ginger slices
A dash of fish sauce
1 tbsp of white cooking wine
1 1/2 tsp corn flour mix with 1 1/2 tbsp of  water

Garnish


~ chopped spring onions
~ curly crisp lettuce

~ celery

Methods :

~ Wash the crabs clean
~ Heat up wok
~ Add butter , chilli flakes , curry leaves, ginger slices  n fry till fragrant

~ Add in the crabs except the shells
~ Stir fried for till crab turn slightly red
~ Add in white cooking wine and fish sauce
~ Add in a can of evaporated milk
~ Bring to boil and add in the shells
~  Give them a good stir n cover pot
~ Simmer till crabs are cooked n gravy reduced
~ Finally scoop up the crabs and turn big flame.
~ Add in corn starch mixture to thicken the butter sauce till creamy .
~ Pour the sauce on top of the crabs n serve with garnish
~ Pair with rice, breads or mantou.

Special note:

~ For a luxury taste, I use 100g of Doux beurre d'isigny butter last round to try out the taste. It was awesome as well.
~ If  you run out of birds' eye chillies, you can use the about 2  packets of dried chilli flakes from Pizza Hut.


Ham & Cheese croissant top with chia seeds


This is a yummy, quick and easy snacks for the young and old. I am using pampas ready puff pastry to make these croissants. To give it a healthier crunch, I added some black organic chai seeds on top.


Ingredients

~ 5 slices of  round honey baked ham ( cut into half )
~ 5 slices of kraft single cheese ( cut into half )
~ 1 big piece of ready pampas puff pastry
~ Some chia seeds
~ 1 egg lightly beaten

Methods:


~ Preheat your oven to 230 degrees
~ Cut the puff pastry with a pizza cutter into triangle shapes
~ Place the ham and cheese on top of the pastry
~ Roll up the pastry together with the fillings.
~ You can brush some egg wash at the end tip to stick the roll together
~ Do a final egg wash on top of the pastry.
~ Top with chia seeds.
~ Bake in oven at 230 degrees for about 15 mins or  till pastry turn golden brown and crispy.
~ Serve warm

Special note:

~ Make sure the puff pastry is still cold when working on it.
~ Oven must be preheated first to get the nice crispy and golden brown look

Another variation that I have done:

Nutella croissants

Monday, August 26, 2013

Crispy potatoes balls


These are breaded potatoes balls which is crispy and yummy.These are a sure hit as an appetizer or an afternoon snack for kids. I managed to eat 1 ball while the rest of the balls "disappeared".

Ingredients:

~ 5 pre-washed potatoes
~ 3 slices of luncheon meats
~ Some Japanese mayo
~ 1 egg lightly beaten
~ 1 cup dry bread crumbs
~ Some chopped green onions
~ 1/4 cup of shredded cheese of your choice
~ Oil for frying

Methods:

~ Chop up the potatoes into small pieces and boiled till soft.
~ Cook the luncheon meats in boiling water to remove any salt.
~ Mashed the potatoes and luncheon meats till all well mixed
~ Add in spring onions, Japanese mayo, shredded cheese and mix well.
~ Cool in the fridge for 2 hours 
~ Roll into balls and dip into the egg mixture follow by the bread crumbs.
~ Fry the potatoes balls a few at a time until golden brown.
~ Remove and drain on paper towels
~ Serve warm with your favorite sauce or eat on its own.


Special note :

~ You can replace with any type of meat you prefer like bacon bits.
~ Fry on medium or low heat as the bread crumbs will turn brown quickly
~  Shredded cheese can be omitted if you like .

Cranberry cream cheese buns


These are my family favorite buns. And they are easy to make and they are so soft and fluffy. There are also methods of using TangZhong to make these breads. But this round, I am using this yogurt recipe shared by my baking buddy Ms Yen Li. I love this recipe as it is easy and soft till next day.

Basic bread dough recipe:

280g bread flour
20g light brown sugar
3g salt
4g yeast
37g egg
30g condensed milk
100g milk
50g strawberry yogurt
28g unsalted butter
30g cranberries

Cream cheese fillings:

125g of cream cheese
30g icing sugar
1tbsp of lemon juice

Methods for the fillings:

Whisk the cream cheese and sugar  and lemon juice together until well combined. Then keep in the fridge for easy wrapping into the buns later.

Methods for the bread dough

~Place everything into the bread maker except the cranberries and mix till well knead and proof for 1 hr. Once ready, take out the dough and punch out the air inside the dough.
~ Divide into individual dough about 45-50g each and add in some cranberries(4-5) inside each dough. Roll into round ball and rest for about 15 min covered in cling wrap.
~ Then flatten each dough with a rolling pin and add in about 1 -1.5 tablespoonful of cream cheese into the center of the dough.
~ Wrap up the dough and pinch tightly with your finger tips. Roll into nice round ball and slightly flatten them with your palm.
~ Proof the balls for about 45min to 1 hour on baking sheets.
~ Bake in oven at 170 degrees for 10 -15min, then flip over the buns and bake for another  10-15 min till both sides of the buns turn brown in colour.


Special Note:

~ Egg wash is not required for these buns.
~ If you have excess cream cheese, you can pipe round the top of the buns to give it a nice swirl.
~ Extra cranberry can be cut into nice heart shape and place on top of the buns.


Original recipe is adapted and modified from:http://siewhwei80.blogspot.sg/2013/03/blog-post_23.html#more


Wednesday, August 21, 2013

Baked cheesy cauliflower bites


Want some vegetables snacks for kids ? Try out this yummy baked cheesy cauliflower bites! Taste really yummy and the best part is that your kids will gain the hidden nutrients in side these yummy snacks.
Among the cruciferous vegetables, cauliflower is something you might want to add to your regular diet. Cauliflower consumption has been studied for its cancer-preventing potential and antioxidant properties. Cauliflower contains many nutrients, making it an excellent addition to any diet. More information can be found here :
http://www.3fatchicks.com/5-health-benefits-of-cauliflower/


Ingredients

2 eggs
45g, 1.5oz Cauliflower
40g Mozzarella grated cheese ( or any of your desired ones)

1 tsp of Italian herbs 
A dash of Paprika powder
Oil for greasing the muffin pan


Sauce

I mixed some wasabi, mayo and cheddar cheese sauce to go with this bites.

Methods

Preheat the oven to 200 degrees.
Cook the cauliflower in boiling water for 4 minutes (or use leftover cauliflower).  
Crack the eggs and add in the cheese. Mix well.
Grease a mini muffin tin.
Once the cauliflower is cooked, drain and cool with cold water. I grind the cooked cauliflower into smash and mixed into the egg and cheese.  Put into the wells of the mini muffin tin and bake for 15 minutes or until puffed up, golden and cooked through.


Note: If you do not have a grinder, you may chopped up the cooked cauliflower as well.

Original recipe and modified from : http://www.britmums.com/2013/05/cauliflower-bites-finger-food-for-toddlers/

Tuesday, August 13, 2013

Heart in a Valrhona chocolate cupcakes


This is a yummy chocolate cupcakes using vegetables oil and valrhona cocoa powder. For the heart shaped, I just baked a regular sponge cake and cut out using heart shaped cutters.
This cupcakes recipe is shared by my baking group buddy Jasmine which she modified from Ina Garten. They are so soft and you just cannot resist the aroma of chocolate. You can also omit the heart shape sponge cake and make it a chocolate cupcakes and top with frosting of your choice. Below I am sharing the recipe on the chocolate cupcakes only.

Ingredients:

120g buttermilk
55g vegetable oil
1 extra -large egg
1/2 tsp pure vanilla extract
110g cake flour
195g caster sugar
46g valrhona cocoa powder
1 tsp baking soda
1/2 tsp baking powder
1/2 fine salt
1/2 freshly brewed hot coffee

Methods:

Combine the buttermilk, oil, egg and vanilla extract into the mixing bowl and mix well.
In another bowl , combine flour, sugar, cocoa, baking soda ,baking powder, and salt , mix well.
Add the dry mixture into the wet mixture in 2-3 batches and mix till incorporated.
Gradually add in the coffee and mix till just combined
Pour the batter into the cupcakes liner till 3/4 full
Baked in a preheated oven at 170degrees for 20 mins or until the stick come out clean when inserted in the middle of the cupcakes.
Let them cool completely before frosting and serve.

For those who are interested to take the challenge to insert the heart shape into the cupcakes, you can refer to these links below for more information. Have fun!!!!

http://madewithloveby.me/2011/03/how-to-bake-a-heart-into-your-cupcakes/
http://bakeitinacake.com/recipes/heartinacupcake


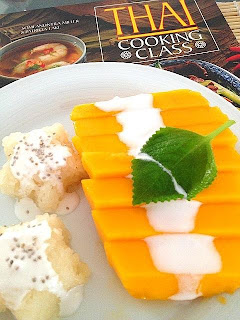
Mangoes with Sticky Rice ( Mamuang Khao Nieo)


Thai cuisine is rich in sweets and desserts but they are not always served after a meal. They are often reserved for banquets , special meals and festive occasions. The usual finale to a meal in Thailand is a platter of fresh fruit ( Ponlamai) , artistically arranged and often skillfully carved into decorative shapes. The simplest of them all, Classic mango with sticky rice , is hard to beat ! It's the perfect finale to a Thai feast and will have your guests begging for more.

This easy recipe is adapted from Thai cooking class cookbook by Somi Anuntra Miller & Patricia Lake


Ingredients:


375g freshly made cooked sticky rice
1 Cup (250ml ) thick coconut milk
4 Tablespoons sugar
2 Teaspoons salt
4 Tablespoons coconut cream, skimmed from top of coconut milk
Roasted sesame seeds to garnish
6 large ripe mangoes, peeled, halved


Methods:
In a saucepan over medium heat, bring coconut milk, sugar and salt to a boil, lower heat and simmer until milk thickens, about 4-5 minutes.

Pour the mixture carefully over sticky rice, fluffing up rice with fork and allowing coconut mixture to trickle through but not" drown" the rice.( otherwise it will becomes too soggy and you lose the lovely translucent quality of the sticky rice.

Allow rice to stand for 10 min, then turn out in any mold ( I am using star shaped mold)  you like on a serving plate.
Garnish with thick coconut cream and sprinkled with sesame seeds.

Slice managoes and arrange around the sticky rice.

Enjoy !

----------------------------------------------------------------------------------------------------------------

How to make Sticky rice ( Khao Nieo)


200g glutinous sticky rice
water, for steaming

Methods:

Rinse rice several times until water runs clear. Soak in water for 12 hours or overnight.
Drain.
Line a saucepan steamer or bamboo basket with cheesecloth . Put rice in the steamer and steam for 45 minutes until rice is tender and translucent. Remove from heat and fluff up with a fork.


Tamagoyaki (Japanese Rolled Omelette) 玉子焼き


Tamagoyaki, literally means ‘grilled egg’, is a type of Japanese omelette made of eggs, sugar, and soy sauce. When dashi stock is added to the egg mixture, it is called dashimaki tamago.
Tamagoyaki is usually served as one of the dishes for Japanese style breakfast and it is a common item to include in a lunch bento box for school. Also, you might have seen this egg omelette served on top of sushi. It is so yummy n you can do this at home .


Ingredients:
  • 3 eggs
 
    Seasonings
     
  • 1 Tbsp. sugar
  • 1 tsp. soy sauce
  • 1 tsp. mirin
  • 1 pinch of salt
  • 4 Tbsp. dashi stock 
  • Served with
  • Grated daikon radish, squeeze water out
  • Soy sauce
  • What you will need:
  • Tamagoyaki frying pan or regular round non-stick frying pan)
  • Paper towel moistened with oil
  • Chopsticks
  • Bamboo mat
 
Methods:
 
1. Crack eggs and mix gently with a pair of chopsticks
2. Combine and mix the seasonings together first.
3. Pour into the egg mixture.
4. Strain the egg mixture through the sieve into a measuring cup.
5. Heat the pan on medium high heat and apply oil using the paper towel. When the pan is getting hot, apply a little bit of egg mixture with the tip of the chopsticks on the surface of pan. If the egg streaks cooks right away, then the pan is ready. 
6. Quickly mix the mixture and spread the egg thinly over the frying pan 
7. Poke the air bubbles with the chopstick in order to push the air out. Start rolling up from the far side to the near side. Control the temperature of the pan by lifting the frying pan rather than adjusting the stove. If the heat is too weak, the egg will stick to the frying pan so be careful. 
8. Apply the oil on the pan. Then move the rolled egg to the far side and apply the oil on the near side.
9. Pour the egg mixture again. Lift the rolled egg to spread the egg mixture underneath. - See more at:
10. Using chopsticks to start rolling. Make sure the chopsticks are touching the egg gently. If you use too much force, the egg will break. At this time the rolled egg doesn’t have to be perfect because eventually it will be nice rectangular shape. 
11. Move the egg to the far side and apply oil.
12. Poor the egg mixture and spread it around, including the bottom of the rolled egg.
13. When egg is cooked, start rolling again. Your tamagoyaki will start to resemble a nice rectangular shape.
14. Now this is 3rd time pouring the egg mixture. Poke the air bubbles.
15. Spreading the mixture for the 4th time. Make sure to spread all over including under the rolled egg.
16. As the rolled egg is getting heavy, roll the egg mostly using your wrist when flipping the frying pan. 
17. Do these step until the last egg mixture is used up.
18. Let the egg brown on both sides.
19. Transfer the egg on the bamboo mat and wrap it up. Shape the egg when it is still hot. Let it stand for 5 minutes.
20.Cut into 6 pieces or more pieces depending on how thick you want the slices to be. Serve with grated daikon. Pour a little bit of soy sauce over grated daikon. 


Below is the link to the steps for additional visual :

Tuesday, August 6, 2013

Homemade Goldfish crackers


Homemade Goldfish crackers? Who in the world has time to make homemade crackers? They looked like they’d be difficult and totally something I wouldn’t be able to pull off. But when I tried making these Homemade Goldfish Crackers , they were... pretty darn easy. And cheesy, too. The recipe was adapted from ReadyMade magazine and it’s totally a fun little cooking project to do with kids. There are only five ingredients with very little preparation. The crackers puff up to a chewy, cheesy bite. Yum yum !My kids love them very much.
 
Before getting started, decide on what shapes you’ll be cutting out. Using an aluminum can and tape, I cut a thin strip and formed my fishy, then taped the edges together with clear packing tape. Please note that the edges will be sharp therefore recommended adults' supervision when cutting the aluminum stripes. The small fishy is about 81/2 inches in length and the big ones are about 121/2 inches in length. The side is about 1/2 inches only.
 
 
I had so much fun that I made fishes and a Pac-Man below. You can also used your own existing cookie cutters as well.


Ingredients

  • 220g of  Orange Shredded Cheddar Cheese
  • 60g of cold Butter, Cut Into Cubes
  • 1 cup Flour (120g)
  • ¾ teaspoons Salt
  • 2 Tablespoons Cold Water

Methods:

~Pulse everything (except water) together in the food processor until the dough resembles coarse sand.
~Pulse in water, 1 tablespoon at a time.
~Remove dough from the processor, knead with hand till smooth dough and  wrap in plastic, and chill for 20 minutes.
~Roll out the dough and cut into desired shapes. You can use a toothpick to make the eyes and smile if desired. Place on a parchment paper lined cookie sheet.


~ Bake at 170 degrees  for about 15-20 minutes, or until crispy.
~ Makes approximately 7 dozen crackers.


Note:
~If you want a crisper cracker, roll your dough to as thin as possible. For a puffier cracker, roll till slightly thicker. Do not roll too thin or else the dough will break easily.
~ Best to be eaten immediately . Not recommended to store beyond 1 day as the crackers will soften very fast.
~ For a healthier version, you can substitute with 50% to 100% of whole wheat flour if desired.
~ Original website :http://tastykitchen.com/blog/2011/09/homemade-goldfish-crackers/

My fishy and Pac-Mac

Thursday, August 1, 2013

Korova Cookies


The first thing that caught my interest with the Korova Cookie was that it was Pastry Girl’s (Dessert First) favorite cookie and that it is French. FRENCH. Dorie Greenspan, the author of Paris Sweets, created this as an “ode to Parisian patisseries.” The history of this cookie can be traced back to Pierre Hermé, the best French pastry chef ever.To put this in a simple term, it’s a very special chocolate cookie that has the most amazing chocolate in it. Yum , you just cannot stop at one. I used valrhona chocolate powder for these cookies and bittersweet chocolate ( chopped into small bits) is prefer.

Ingredients
  • 175g of plain flour
  • 3og of Valrhona chocolate powder
  • ½ teaspoon of baking soda
  • 150 grams of unsalted butter, at room temperature
  • 120g of brown sugar
  • 50g of granulated sugar
  • 1/2 teaspoon fleur de sel or 1/4 teaspoon fine sea salt
  • 1 teaspoon of pure vanilla extract
  • 150g of mini Hershey chocolate chips ( bittersweet chocolate is the best)

Instructions
  1. Put the butter in the bowl of an electric mixer with a paddle attachment fitted and beat on a medium speed until the butter is creamy.
  2. Add the brown and white sugars, salt and vanilla extract and beat for a couple of minutes.
  3. Reduce the mixer to a low speed and sift in the flour, cocoa and baking soda and beat until combined. Note the mixture will look crumbly, but this is normal.
  4. Turn the mixture our onto some cling film and squeeze the dough into a ball and then divide into tow. Form each ball into a log and wrap up in cling film and put in the fridge to chill for at least 2 hours.
  5. Preheat the oven for 165 degrees celsius or 325 farenheit and move an oven rack to the center of the oven.
  6. With a sharp knife slice the logs into rounds about 1.5cm or ½ an inch thick. If the cookies break when sliced just squash them back together again. Place each cookie onto a non-stick baking tray or baking tray lined with baking paper.
  7. Bake each cookie for 12 minutes. Note that the cookies will not look cooked, but they will firm when they cool.

Notes:
~The cookies can be kept for up to 3 days at room temperature or frozen for up to a month. The dough can be frozen, no need to defrost before baking, however add 1 minute to the baking time.
 ~Bake only one sheet of cookies at a time and bake each sheet for 12 minutes. The cookies will not look done, nor will they be firm, but that's just the way they should be. Transfer the baking sheet to a cooling rack and let the cookies rest, on the baking sheet, until they are only just warm or until they reach room temperature. Repeat with the second sheet of cookies.

~Makes about 36 cookies.
 
- See more at: http://www.ledelicieux.com/recipes/korova-cookies/
http://doriegreenspan.com/2009/02/tuesdays-with-dorie-world-peace-cookies.html
A copy of this book can be found here:http://www.amazon.com/Paris-Sweets-Great-Desserts-Pastry/dp/0767906810?SubscriptionId=AKIAIS3PNIIKPASK3QNA&tag=delicieux-20


Oyakodon (Chicken and Egg Bowl) 親子丼

 
The literal translation of Oyakodon (親子丼) means “parent-and-child rice bowl.” The typical ingredients include chicken (as in parent), egg (as in child), and onions. The ingredients are simmered together in a sauce then served on top of a bowl of rice. It’s a very common Donburi dish and served at most traditional Japanese diners. This is a quick and easy recipe.
 

Prep Time: 10 minutes
Cook Time: 20 minutes
Yield: Serves 2
   
Ingredients:

 
  • 2 chicken thighs, rinsed and patted dry
  • 2 eggs
  • ½ onion, thinly sliced
  • 3 Tbsp. mirin
  • 1 Tbsp. sake
  • 2 Tbsp. soy sauce
  • 1 Tbsp. sugar
  • 1 cup dashi stock
  • Chopped mitsuba or finely chopped green onion, seaweeds  for garnish
  • Cooked Japanese rice with vinegar
 
 
Methods:

  1. Cut the chicken diagonally into small pieces
  2. Crack eggs into a bowl. DO NOT BEAT. Instead, hold chopsticks with the tip of chopsticks touching the bottom of the bowl, and write “Z” a couple of times. Set aside.
  3. In a shallow frying pan, heat mirin and sake and bring it to a boil.
  4. Add soy sauce, sugar, and dashi and bring it to a boil.
  5. Spread the onion into the pan and place chicken on top. Cover with a lid and keep the heat on high until it boils.
  6. Once it boils, skim off the scum and fat, and lower the heat to medium and cook for 12 minutes, or until the chicken is cooked through and onion is soft. You can lightly stir the chicken and onion while cooking.
  7. Slowly and evenly add eggs into the pan instead of pouring at once.
  8. Use chopsticks and poke around the ingredients so eggs will disperse evenly. Shake the pan so the ingredients move around and bottom doesn’t stick to the pan.
  9. Serve Japanese rice in a large serving bowl.
  10. When the egg is cooked about 80%, add mitsuba (or green onions) and turn off the heat after 1 minute.
  11. Pour the mixture on top of rice and pour extra sauce. Serve immediately
 Original recipe from :http://justonecookbook.com/blog/recipes/oyakodon/